Build Your Own Solar Panels: Step-by-Step Instructions
Tired of watching your electricity bill climb higher and higher each month? Yearning for the freedom of energy independence? Building your own solar panels might seem like a daunting task reserved for electrical engineers, but with the right knowledge and a little patience, you can significantly reduce your energy costs and contribute to a cleaner environment. Imagine powering your home with sunshine, a truly renewable and readily available resource. Let's explore how to build your own solar panels, step-by-step.
Embarking on a DIY solar panel project allows you to tailor your energy solution to your specific needs and budget. Commercial solar panel systems can be incredibly expensive, and often include unnecessary features. By building your own, you have complete control over the materials used, the size of the array, and the overall cost. You'll also gain a deep understanding of how solar energy works, empowering you to maintain and troubleshoot your system effectively. This knowledge can be invaluable, especially if you're considering an off-grid lifestyle or simply want to be more self-sufficient.
Before diving in, grab a multimeter and test the voltage of a household battery. Getting comfortable with basic electrical measurement will be important later when testing your solar cells!
Build Your Own Solar Panels: Step-by-Step Instructions
This project involves working with electricity and requires careful attention to safety. Always disconnect power sources before working on electrical components, and wear appropriate safety gear like gloves and eye protection. If you're not comfortable working with electricity, consider consulting with a qualified electrician.
The core of your solar panel will be individual solar cells. These are typically made of silicon and come in various sizes and power outputs. Look for high-efficiency cells to maximize the energy generated by your panels. Common cell sizes are 3x6 inches and 6x6 inches. You'll need to determine how many cells you want to include in each panel. More cells mean more power output, but also a larger panel size. For a typical 12V panel for battery charging, you'll need around 36 cells in series.
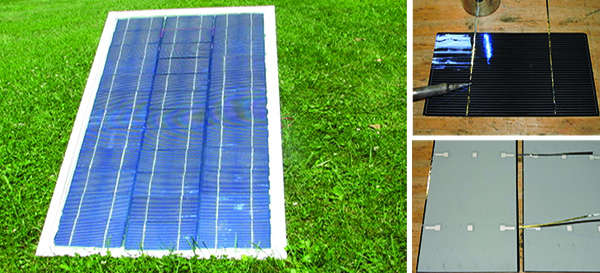
Materials and Tools You'll Need
Gathering the right materials and tools is crucial for a successful DIY solar panel build. Here's a comprehensive list: Solar Cells: Purchase high-quality solar cells from a reputable supplier. Tabbing Wire: This thin, solder-coated wire connects the solar cells. Flux Pen: Flux helps the solder flow smoothly and create a strong bond. Soldering Iron and Solder: For connecting the tabbing wire to the cells. Multimeter: For testing the voltage and current of your solar cells and completed panel. Encapsulant (EVA Film): This clear, flexible material protects the solar cells from the elements. Backsheet: A durable, weatherproof material that forms the back of the panel. Glass or Acrylic Sheet: This provides a transparent, protective front for the panel. Tempered glass is ideal for durability. Junction Box: A small enclosure that houses the wiring connections on the back of the panel. Silicone Sealant: To seal the edges of the panel and prevent water ingress. Frame (Aluminum or Wood): Provides structural support for the panel. Wiring and Connectors: For connecting the panel to your electrical system. Safety Glasses and Gloves: Essential for protecting yourself during the build process. Straight Edge and Ruler: For precise measurements and alignment. Cutting Tools:For trimming the encapsulant and backsheet.
Step-by-Step Assembly Process
1.Prepare the Cells: Carefully inspect each solar cell for any cracks or damage. Clean the cells with a soft cloth to remove any dust or fingerprints.
2.Tab the Cells: Using the flux pen, apply flux to the solder pads on the front and back of each solar cell. Cut the tabbing wire to the appropriate length and solder it to the front of one cell and the back of the next. This creates a series connection. Be careful not to apply too much heat, as this can damage the cells. Practice soldering on a scrap piece first!
3.Assemble the Array: Arrange the tabbing wires in rows on a flat surface according to your desired voltage. Solder the tabbing wires to connect all the cells in series. Ensure all connections are secure.
4.Laminate the Panel: Place a layer of EVA film on the glass or acrylic sheet. Carefully position the assembled solar cell array on top of the EVA film. Cover the array with another layer of EVA film, followed by the backsheet. This "sandwich" is what holds everything together.
5.Apply Heat and Pressure: This is the most challenging part without specialized equipment. A vacuum bagging system is ideal for this step. However, you can improvise by carefully pressing the layers together with a heavy, flat object and using a heat gun or oven (set to a low temperature) to melt the EVA film. Be extremely careful not to overheat or damage the cells. The goal is to create a solid, airtight bond between all the layers.
6.Trim and Seal: Once the EVA film has cooled and solidified, carefully trim any excess encapsulant and backsheet. Apply silicone sealant around the edges of the panel to create a waterproof seal.
7.Install the Junction Box: Attach the junction box to the back of the panel and connect the positive and negative leads from the solar cell array to the terminals inside the junction box.
8.Frame the Panel: Secure the finished panel to the aluminum or wood frame. This provides structural support and makes it easier to mount the panel.
9.Testing: Now, connect your multimeter to the leads coming from the junction box and measure the voltage and current output of your panel in direct sunlight. Compare these values to the specifications of your solar cells to ensure everything is working correctly.
Optimizing Your Solar Panel Setup
The angle at which your solar panels are mounted significantly impacts their energy output. In the Northern Hemisphere, panels should typically face south, and in the Southern Hemisphere, they should face north. The optimal tilt angle depends on your latitude and the season. A good rule of thumb is to set the tilt angle equal to your latitude for year-round performance. During the summer, you can reduce the tilt angle by 15 degrees, and during the winter, you can increase it by 15 degrees.
Consider seasonal adjustments. In winter, the sun is lower in the sky, so adjusting the angle can capture more sunlight. Cleaning your panels regularly is also crucial, especially in dusty or snowy environments. Even a thin layer of dirt can significantly reduce their efficiency.
Troubleshooting and Maintenance
Low Output: If your panel is producing less power than expected, check the connections between the solar cells and the junction box. Also, make sure the panel is clean and properly oriented. Damaged Cells: If you notice any cracked or broken solar cells, they will need to be replaced. Water Ingress:If water gets inside the panel, it can damage the solar cells and wiring. Check the silicone sealant regularly and reapply if necessary.
Expanding Your DIY Solar Projects
Once you've mastered the art of building your own solar panels, you can explore other DIY solar projects. Consider building a solar water heater to reduce your water heating costs. You can also create a solar-powered generator by connecting your panels to a battery and inverter. These projects can help you further reduce your reliance on the grid and increase your self-sufficiency. Remember to consult with local authorities regarding any permits required for your solar installations.
Building your own solar panels offers a rewarding and cost-effective way to harness the power of the sun. With careful planning, attention to detail, and a commitment to safety, you can create a sustainable energy solution that benefits both your wallet and the environment.
Frequently Asked Questions
How much does it cost to build your own solar panel?
The cost varies depending on the size and quality of the materials, but generally, you can build a solar panel for significantly less than purchasing a commercially made one. Expect to spend between $50 and $150 per panel for materials. Larger panels cost more, while smaller test panels cost less.
Is it legal to build your own solar panels?
Yes, it's perfectly legal to build your own solar panels. However, connecting them to the grid may require permits and inspections from your local utility company. Check your local regulations before connecting your DIY panels to the grid.
How long do DIY solar panels last?
With proper construction and maintenance, DIY solar panels can last for 10-20 years or more. Using high-quality materials and protecting the panels from the elements will extend their lifespan.
What are the biggest risks of building your own solar panels?
The biggest risks involve electrical shock during the build process and potential fire hazards if the panels are not wired correctly. Always follow safety precautions and consult with a qualified electrician if you're not comfortable working with electricity.
Can I power my whole house with DIY solar panels?
Yes, it's possible to power your whole house with DIY solar panels, but it requires a significant investment in materials and a large array of panels. You'll also need a battery bank to store energy for nighttime use and an inverter to convert the DC power from the panels to AC power for your appliances. A hybrid system is often a practical way to start, with DIY panels providing a percentage of total use.
What size solar panel do I need to charge a 12V battery?
For a standard 12V battery, you'll need a solar panel with a voltage output of around 17-19V. A panel with a power output of 50-100 watts should be sufficient for charging a typical car or RV battery. The exact size will depend on the battery's capacity and how quickly you want to charge it.
Ready to begin? Research reputable solar cell suppliers and start gathering your materials. Even a small test panel can be an amazing learning experience. Take the first step towards energy independence, and start building your own solar panels today!
Post a Comment for "Build Your Own Solar Panels: Step-by-Step Instructions"