DIY Solar Distiller: Purify Water with Sunlight
Imagine turning the sun's abundant energy into a reliable source of clean drinking water, right in your backyard. A DIY solar distiller offers that potential, especially useful for homeowners concerned about water quality, those seeking a more sustainable lifestyle, or anyone preparing for emergencies. It's a project that combines resourcefulness with environmental consciousness, giving you greater control over a vital resource.
Harnessing solar energy to purify water makes a compelling case for several reasons. For budget-conscious families, it can significantly reduce reliance on bottled water or expensive filtration systems. Off-grid enthusiasts gain another layer of self-sufficiency, independent from municipal water supplies. And from a preparedness standpoint, knowing you can create potable water in an emergency offers invaluable peace of mind.
Start small: Place a dark-colored bowl of water in direct sunlight. Cover it loosely with clear plastic wrap, weighted down at the edges. Place a small, clean weight in the center of the plastic wrap, creating a slight dip directly above the bowl. See how much condensation collects over the course of a sunny day – this is a miniature solar still in action!
Building Your Own DIY Solar Distiller
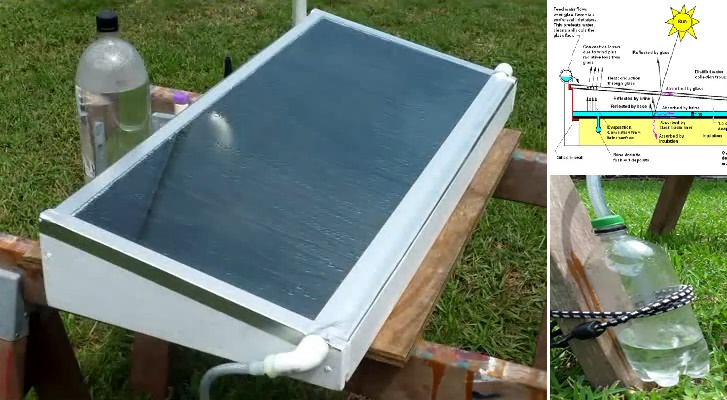
Creating your own DIY solar distiller is a rewarding project, and the complexity can range from simple to more involved, depending on your desired output and available resources. The basic principle remains the same: sunlight heats the water, causing it to evaporate. The water vapor then condenses on a cooler surface, and the purified water is collected.
The simplest version, often called a "solar still," can be constructed using readily available materials like a plastic container, a smaller collection cup, and clear plastic wrap or glass. More advanced designs might incorporate insulated boxes, angled glass covers for better solar capture, and dedicated collection systems.
Here's a step-by-step guide to building a basic DIY solar distiller:
1.Gather your materials: You'll need a large, shallow container (dark-colored is best for absorbing heat), a smaller container to collect the purified water, clear plastic wrap or a sheet of glass, weights (rocks or metal), and some dirty or non-potable water.
2.Assemble the distiller: Place the smaller collection container inside the larger container. Make sure it's stable and won't tip over easily.
3.Add the dirty water: Pour the dirty water into the larger container, being careful not to get any in the collection container. Fill it to a level below the top of the collection container.
4.Cover the distiller: Cover the large container with clear plastic wrap or a sheet of glass. Secure the edges tightly with weights to prevent vapor from escaping.
5.Create a condensation point: Place a small weight in the center of the plastic wrap or glass, directly above the collection container. This will create a dip, encouraging condensation to drip into the collection container.
6.Place in direct sunlight: Position the solar distiller in a location that receives direct sunlight for as many hours as possible.
7.Wait and collect: Over time, the sun's heat will evaporate the water, which will then condense on the underside of the plastic wrap or glass and drip into the collection container. The time it takes to collect a significant amount of water will depend on the intensity of the sunlight and the size of your distiller.
Optimizing Your Solar Distiller for Maximum Output
Several factors can influence the efficiency of your DIY Solar Distiller: Purify Water with Sunlight design. Dark-colored materials absorb heat more effectively, so using a dark container or painting the inside of your distiller black can significantly increase its output. Insulating the sides and bottom of the distiller can also help retain heat.
The angle of the glass or plastic cover also plays a role. Experiment with different angles to find the one that maximizes solar capture in your specific location. A steeper angle might be more effective during the winter months when the sun is lower in the sky.
Troubleshooting Common Solar Distiller Issues
One common issue is leakage. Ensure the cover is tightly sealed to prevent water vapor from escaping. Another is algae growth in the dirty water. Using opaque containers can help prevent this, but you should also regularly clean the distiller. Condensation dripping on the sides of your container instead of your collection container is another challenge. Experiment with the angle of the cover, and ensure the weighted point is directly above the collection container. Also, ensure the collection cup is high enough that minimal water remains on the surface of the dirty water.
Off-Grid Living and Renewable Energy Savings
DIY solar projects, including a DIY Solar Distiller: Purify Water with Sunlight, are a cornerstone of off-grid living. They provide a sustainable and cost-effective way to meet basic needs like water purification. When combined with other renewable energy sources like solar panels for electricity and solar water heaters for hot water, you can significantly reduce your reliance on traditional utilities.
Off-grid solar kits are a convenient way to get started with solar energy, but many components can be sourced independently to save money and customize your system. Understanding the basics of solar panel wiring, battery storage, and inverters is crucial for building a safe and efficient off-grid system.
Consider your location's climate and available sunlight when designing your off-grid solar system. Regions with abundant sunshine are ideal for solar energy, but even areas with less sunlight can benefit from well-designed systems. Maximize sun exposure by carefully positioning your solar panels and ensuring they are free from shade.
DIY Solar Projects Beyond Water Distillation
Once you've built a solar distiller, consider other DIY solar projects to expand your energy independence. Solar ovens are a fun and practical way to cook food using sunlight, and solar water heaters can provide hot water for showers and washing dishes. Solar lights are another simple and effective way to harness solar energy for outdoor lighting.
Many resources are available online and in libraries to guide you through these projects. Start with small, manageable projects and gradually increase the complexity as you gain experience.
Safety and Maintenance of Your DIY Solar Setup
Safety should always be a top priority when working with solar energy. Wear appropriate safety gear, such as gloves and eye protection, when handling tools and materials. Be careful when working with electricity, and always disconnect the power before making any repairs or modifications to your solar system.
Regular maintenance is essential for ensuring the longevity and efficiency of your DIY solar setup. Clean your solar panels regularly to remove dirt and debris that can block sunlight. Check wiring connections for corrosion or damage, and replace any worn or damaged components.
Keep an eye on your solar distiller for leaks or damage, and repair them promptly. Regularly clean the distiller to prevent algae growth and maintain water quality. Periodically test the purified water to ensure it meets your desired standards.
Signs of Solar Setup Issues
Several signs can indicate problems with your solar setup. Low power output from your solar panels could be due to shading, dirt, or damaged panels. A decrease in water production from your solar distiller could be due to leaks, algae growth, or reduced sunlight. Unusual noises or smells from your solar system should also be investigated immediately.
Consult with a qualified solar professional if you encounter any issues that you cannot resolve yourself. They can help diagnose the problem and recommend appropriate solutions.
FAQ About DIY Solar Distillers
Is the water from a DIY solar distiller safe to drink?
Yes, water produced by a properly functioning solar distiller is generally safe to drink. The distillation process removes most impurities, including bacteria, viruses, and heavy metals. However, it's always a good idea to test the water periodically to ensure its quality.
How much water can a DIY solar distiller produce?
The amount of water a DIY solar distiller can produce depends on several factors, including the size of the distiller, the intensity of the sunlight, and the ambient temperature. A small distiller can produce a few liters of water per day, while a larger distiller can produce significantly more.
What type of water can I use in a DIY solar distiller?
You can use almost any type of water in a DIY solar distiller, including brackish water, well water, and even seawater. The distillation process removes the impurities, leaving you with clean, potable water. However, it's important to pre-filter heavily contaminated water to remove large particles before distilling it.
Can I use a solar distiller in the winter?
Yes, you can use a solar distiller in the winter, but the output may be lower due to the reduced intensity of the sunlight and the colder temperatures. Consider optimizing the angle of the distiller to maximize solar capture during the winter months.
How often should I clean my DIY solar distiller?
You should clean your DIY solar distiller regularly to prevent algae growth and maintain water quality. The frequency of cleaning will depend on the quality of the water you're using and the environmental conditions. A general guideline is to clean the distiller every few weeks or as needed.
What are the limitations of a DIY solar distiller?
While effective, a DIY Solar Distiller: Purify Water with Sunlight has limitations. It's dependent on sunlight, so output varies. It's slower than other purification methods, and plastic components can degrade over time with UV exposure. Still, it’s a viable emergency and off-grid option.
Ready to take the next step toward water independence? Start planning your DIY Solar Distiller: Purify Water with Sunlight today and experience the satisfaction of creating your own clean water using the power of the sun.
Post a Comment for "DIY Solar Distiller: Purify Water with Sunlight"